Marketplace purchases
Sellers promise an “i7” or “RTX laptop,” but the CPU tab shows the exact SKU, stepping, and core layout. Pair it with Memory/SPD when the listing mentions RAM speed or XMP.
CPU-Z freeware from the official developer: hardware IDs in clear tabs. This guide covers what each area means, real-world use, fixes when readings look wrong, and safe download links.
Live gallery
Coverage
CPU, caches, board, DRAM, SPD, graphics
Outputs
TXT/HTML reports, validation snapshots
Context
Idle vs load, AC vs battery, BIOS profiles
Audience
Buyers, builders, tech support, overclockers
CPU-Z is often the fastest way to settle arguments about “what chip is this,” whether XMP is active, or which BIOS string a board is really running. Forums still ask for the same screenshots because they compress a lot of identifiers into one place—if you know how to read them.
This guide is written for people who do not want to guess. You will see how each tab maps to real decisions: buying a used PC, planning a RAM upgrade, filing an RMA, tuning an overclock, or explaining why a laptop’s clocks look low on battery.
Sellers promise an “i7” or “RTX laptop,” but the CPU tab shows the exact SKU, stepping, and core layout. Pair it with Memory/SPD when the listing mentions RAM speed or XMP.
SPD reveals ranks, XMP/EXPO tables, and JEDEC bins—critical before you buy a second kit. Memory shows what the firmware actually selected after POST.
Agents want unambiguous model strings. A TXT report or a tight set of tab screenshots reduces round-trips and avoids blurry photos of silkscreen labels.
Clocks and voltages move with power policy, background tasks, and firmware limits. A reading taken two seconds after opening the app is not the same as a reading after a short stress test—or on AC vs battery.
CPU-Z answers “what is wired in and what is the firmware choosing right now.” It does not replace a full benchmark suite, a memtest pass, or a long thermal log. Treat it as the first layer of evidence—fast, lightweight, and easy to share.
Good for
IDs, clocks at a glance, SPD tables, board strings
Pair with
Temps, stress tests, MemTest86, vendor utilities
Weak alone
Stability proof, gaming FPS, storage health
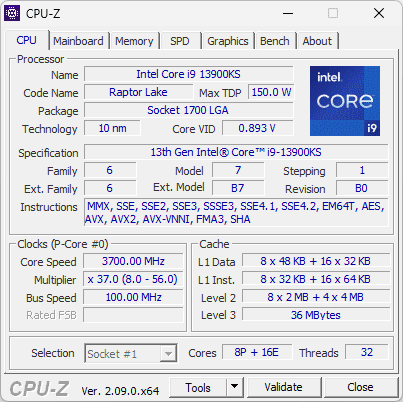
CPU & Caches
Model, cores, caches, instruction sets, and live clocks—start here for “which CPU is this?”
Mainboard
Vendor strings, model, chipset, BIOS—pair with the board’s download page before flashing.
Memory
What the system runs now: type, size, mode, frequency, timings.
SPD
Per-stick EEPROM tables—useful before buying another kit or arguing about XMP.
Graphics
What the driver exposes for the GPU block—handy on hybrid graphics laptops.
Bench
A simple throughput check on builds that still ship it—not a replacement for real benchmarks.
About
Build version and validation tools entry point—confirm you are on the binary you think you launched.
When someone refuses CPU-Z screenshots but offers a blurry Task Manager crop, treat it as a signal to slow down. These patterns are common in rushed marketplace deals.
Many builds support dumping a text report for tickets. Exact switches vary by version—verify in the build you run—but the pattern looks like:
cpuz.exe -txt=reportAttach the generated file to support email instead of six separate screenshots when an agent requests “full details.”
Dynamic power limits and “silent” OEM modes can cap turbo harder than desktops. Capture CPU-Z twice: on battery vs AC, and after switching Windows power modes.
Arm64 builds exist for some Snapdragon-class machines; tab coverage can differ from classic x64. Treat missing fields as a platform quirk until you confirm with release notes.
Standardize a screenshot set per ticket type (CPU+Mainboard for BIOS cases, Memory+SPD for RAM cases) so your team compares apples to apples.
The app reads from CPUID instructions (CPU, caches, instruction sets), SMBus/SPD (module EEPROMs where allowed), PCI config space (graphics, sometimes board), and DMI tables (mainboard, BIOS). Some probes can fail or be disabled—hence the cpuz.ini toggles for DMI, Sensor, SMBus, Display.
Sensor data (voltages, temps) comes from Super I/O or similar when enabled; routing differs by board, so misreads are possible—use HWMonitor or vendor tools to cross-check.
Before sharing, capture at least:
cpuz.ini one by one. Fix issues-txt=report dumps a text report; -html=report for HTML (exact flags vary by version).ZIP portable
Extract and run—no install, no registry. Ideal for USB sticks, lab images, or quick checks on multiple machines without leaving traces.
Installer
Adds shortcuts, may integrate with validation; easier for daily use. Both builds read the same hardware; choose based on workflow.
| Tool | Focus |
|---|---|
| CPU-Z | IDs, clocks, SPD, board strings, validation |
| HWMonitor | Voltages, temps, fan speeds—pair when sensors disagree |
| Task Manager | Quick clock view; no SPD, no board, limited per-core detail |
| MemTest86 | RAM stability; run after CPU-Z confirms SPD and XMP setup |
When CPU-Z shows different clocks or voltages than HWMonitor, Core Temp, or vendor software: routing differs by board and Super I/O. CPU-Z reads what its probes expose; other tools may use different paths. Cross-check with a second tool and note which one matches BIOS or vendor documentation. For voltage disputes, HWMonitor or vendor utilities are often preferred.
CPU-Z shows the chip’s Specification and stepping; it does not label “OEM” vs “retail” directly. Some OEM chips have different stepping or branding; compare against Intel Ark or AMD product pages. Package type and socket are reliable; marketing names can differ between tray and boxed SKUs.
For board RMA, model and revision strings from Mainboard are what vendors expect—OEM vs retail is less relevant there.
cpuz.ini, disable DMI/Sensor/SMBus/Display one by one. See Fix issues.Hardware requirements
Minimal: Windows x64, ~50 MB disk. Runs on almost any PC; ARM64 builds exist for supported Windows-on-Arm devices.
Languages
Multi-language builds available; choose the installer or ZIP that matches your locale from the official download page.
Updates
Check the official site for new versions; changelog lists CPU support, DDR5/DIMM updates, and platform fixes.
Clock puzzles
See Tips for real-world load patterns, then Fix issues if numbers refuse to move.
RAM mysteries
Jump to Reading specs for Memory vs SPD, then cross-check BIOS screenshots if possible.
Crashes on launch
The Fix issues section walks through disabling probes in cpuz.ini one group at a time.
Each section below goes deeper with different examples: tab-by-tab explanations, troubleshooting patterns, FAQs, and companion tools when sensors disagree. Use the gallery above as a visual anchor while you read.
CPU-Z does not benchmark your whole PC in the way Cinebench or 3DMark do. It is a hardware reporter: it queries CPUID instructions, SMBus/SPD where allowed, and PCI information to show what is installed and how it is running right now. The current Windows build is widely used on Windows 11 and remains a standard reference when forum users ask “screenshot your CPU-Z CPU and Memory tabs.”
Because readings can be affected by power limits, background load, and BIOS settings, CPU-Z works best alongside a bit of context: note whether you are on battery (laptops), whether Eco/Quiet modes are on, and whether any overclock or XMP/EXPO profile is enabled.
This site is not affiliated with the original developer. Prefer official sources for binaries and release notes.
The following matches how CPU-Z presents data on a typical desktop. Exact fields vary by CPU generation and vendor.
Name, code name, socket, process node, core/thread count, core speeds, bus and multiplier, instruction sets, and cache hierarchy summary—ideal for proving you received the chip you ordered.
Manufacturer, model, chipset, BIOS version, PCIe link info where exposed—useful when a BIOS update is required for a new CPU or memory QVL issues appear.
Current DRAM type, size, channel mode, frequency, and timings. The SPD tab lists JEDEC and XMP/EXPO profiles per module—critical when mixing kits or tuning voltage.
GPU name, vendor, process, clocks, and memory type where the driver exposes them—handy for iGPU vs discrete confusion on laptops.
Per-core frequency updates help you see whether Turbo is engaging. Compare idle vs load with a quick stress test (and watch thermals with a monitor tool).
Submit a validation to the online validation database for a shareable link—often used in overclocking contests and marketplace listings.
Use this section when someone asks for “CPU-Z screenshots” and you are not sure which tab matters.
Focus on Specification (marketing name), Code Name (silicon family), and Package (socket). The Core Speed field moves with load—if it looks “too low,” open a second window or use Task Manager sorted by CPU while you run a short stress test. On laptops, plug in AC power; many firmware policies cap turbo on battery.
Right-clicking in the CPU page (on supported versions) can let you pick which core to display—useful when diagnosing uneven core boosting after a bad undervolt or thermal paste application.
Memory shows what the system is running now (channels, frequency, timings). SPD shows what the module claims in its EEPROM—including multiple JEDEC bins and XMP/EXPO profiles.
If the running frequency is below the XMP you expected, check BIOS: profile enabled? Board QVL? Mixed kits often fall back to the safest common JEDEC speed. CPU-Z’s FAQ explains cases where theoretical bandwidth from SPD timing fields can read lower than the label speed—SPD programming and voltage-dependent profiles are common reasons.
Pair this with your board’s support page: BIOS string mismatch often means you are one revision behind for a new CPU stepping. When RMA’ing a board, vendors frequently want model and revision strings exactly as reported.
The validation service valid.x86.fr lets users upload validations to get a permanent page showing CPU, motherboard, RAM, and scores where applicable. That is why you see long lists of example links in enthusiast threads: each URL is a frozen snapshot others can audit.
For search engines, descriptive pages that explain how to read a validation (and what cheating or swapped screenshots look like) tend to earn longer visits—signals that help visibility in Google, Bing, and Yandex when paired with clean structure and unique copy.
Real situations where CPU-Z saves time—practical notes from real builders and buyers.
Ask the seller for CPU-Z CPU + Mainboard + Memory tabs, or run it live on pickup. Mismatched CPU stepping vs listing, or a BIOS that does not match the board revision, has saved many buyers from “i7 laptop” listings that were actually a renamed low-power SKU.
SPD shows whether you already have 1Rx8 or 2Rx8 sticks, rated speed bins, and if XMP is present. That reduces “bought 3200 but runs 2133” surprises after you discover the second kit only had JEDEC tables the board picked by default.
Support agents often want unambiguous model strings. A TXT report (cpuz.exe -txt=report per official documentation) attaches cleanly to tickets compared to blurry photos of CPU laser marking.
After tuning, validators document the run for peers. Combine with temperature logs from Core Temp or HWMonitor so clock screenshots are not misread as stable if the chip was thermal throttling.
Summarized from the developer's public FAQ (always verify on the official page). These are starting points, not guarantees.
Idle power-saving (EIST/SpeedStep, C-states, AMD Cool’n’Quiet) lowers clocks. Put the machine under load and watch the core speed climb. Laptops: check power mode and AC adapter wattage.
The developer suggests using HWMonitor, saving monitoring data, and sending it through their bug report form—sensor routing differs by board and Super I/O chip.
Edit cpuz.ini: set DMI, Sensor, SMBus, Display, and UseDisplayAPI to 0, then re-enable one at a time to find the trigger. Report which flag causes the crash to the developer.
Enable the profile in BIOS (XMP/EXPO/D.O.C.P.). If still low, inspect SPD: mixed kits, motherboard limits, or conservative JEDEC tables may explain it. MemTest86 (memtest.org) helps confirm stability after changes.
Download only from the official source or listed mirrors. The installer build is digitally signed when obtained from official sources. Avoid repackaged “bundled” installers from unrelated download portals.
No. It may include a simple bench tab on some builds, but serious performance testing still uses dedicated benchmarks and thermal logging under controlled conditions.
They compress many identifiers into one view, reducing back-and-forth. Pair screenshots with a validation link when you want a third-party timestamped record.
Use the official bug report form with the files they request. Check social channels for the developer's support channels.
If CPU-Z answers “what is installed,” these tools help with “how hot,” “how stable,” and “what else to check.”
Voltages, temperatures, and fan speeds—pairs with CPU-Z when sensors disagree.
Extended monitoring features for enthusiasts and small labs.
Commercial kits for system information and monitoring integration.
Third-party system inventories—compare readings when something looks off.
Online hardware reports and driver context—useful after board swaps.
Links below point to the official current English builds. Version numbers change over time—if a link 404s, open the official page and grab the latest EXE or ZIP.
Android and ARM64 Windows builds are available—check the official release notes for the latest builds and news.